Lesson 5
1. In the previous lesson, you got familiarized with Scratch and created your first code! In this lesson, you’ll program a game. It will be fun!

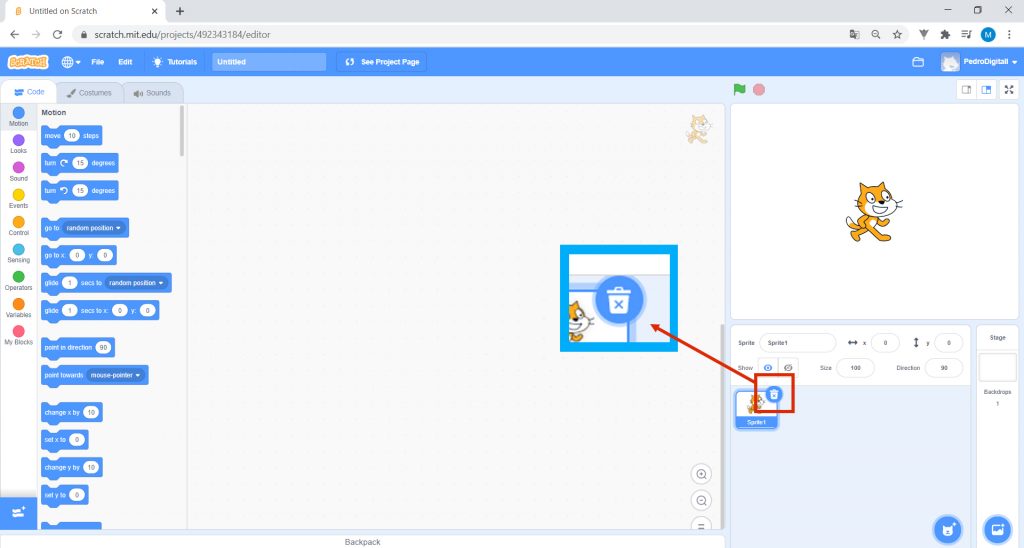
2. Start by turning on the computer, open Scratch and then delete the Cat, as you learned in the previous lesson. So far, nothing new!

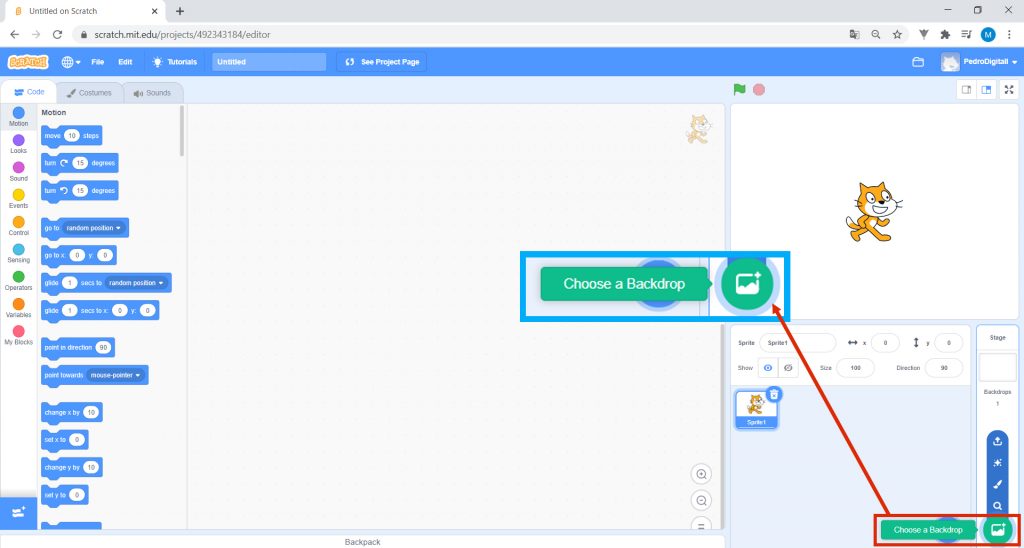
3. Click on Choose a Backdrop. Go where it says Outdoors and select Wall 1.

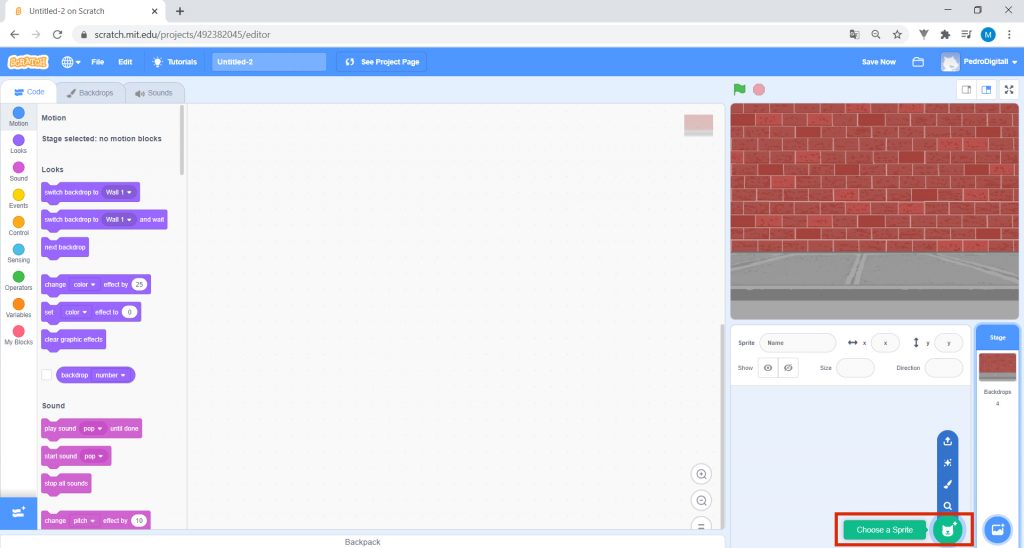
4. Then, select Choose a Sprite.
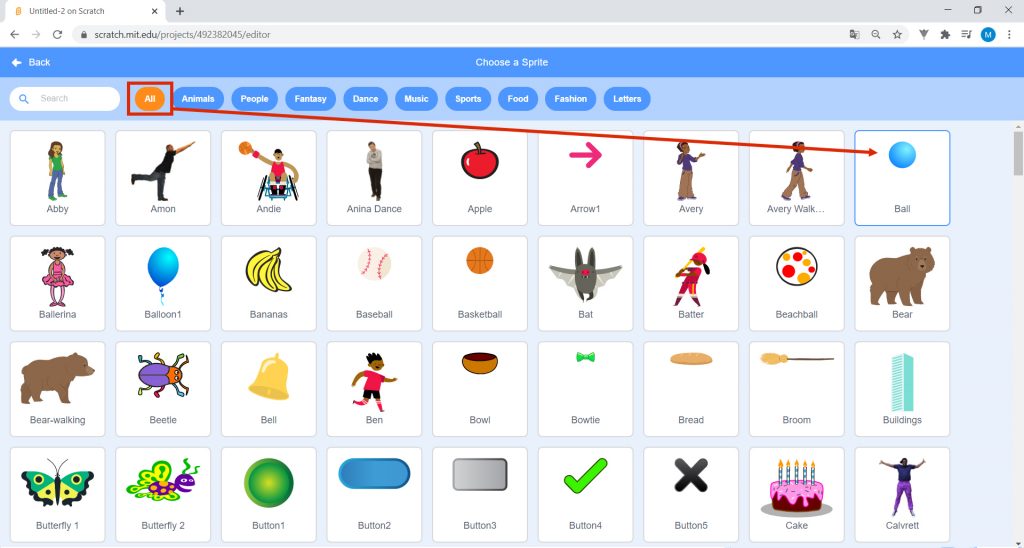
Choose Ball.

5. In the Blocks area, go to the Events blocks, select When green flag clicked and drag it to the Scripts area.
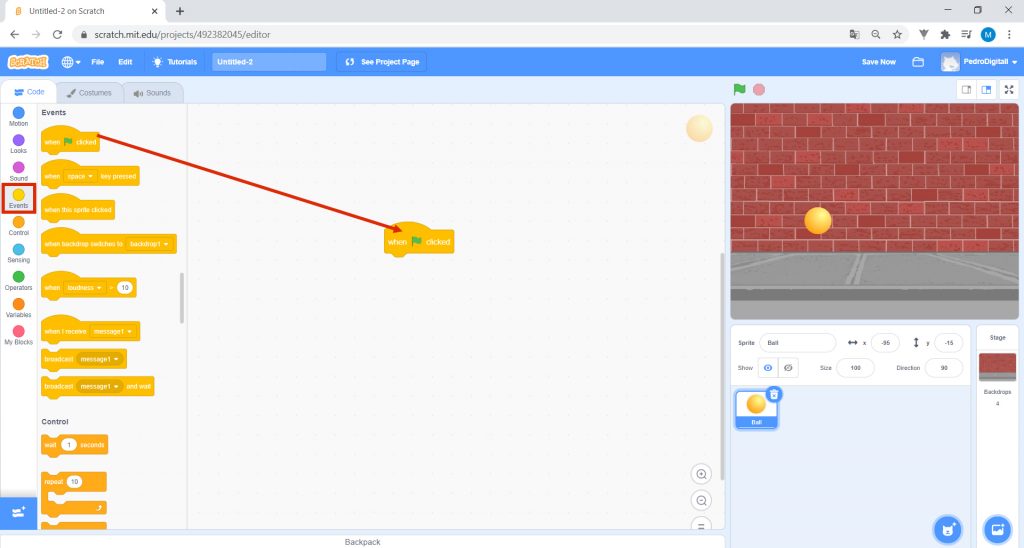

6. In this game, you want the ball to move from side to side on the Stage. It should bounce whenever it touches the side walls, as well as the wall in the image. As soon as it touches the bottom wall, the ball must stop. Place the Ball at the center of the Stage, as you can see in the image. Whenever you begin the program, you want the ball to start from this place.
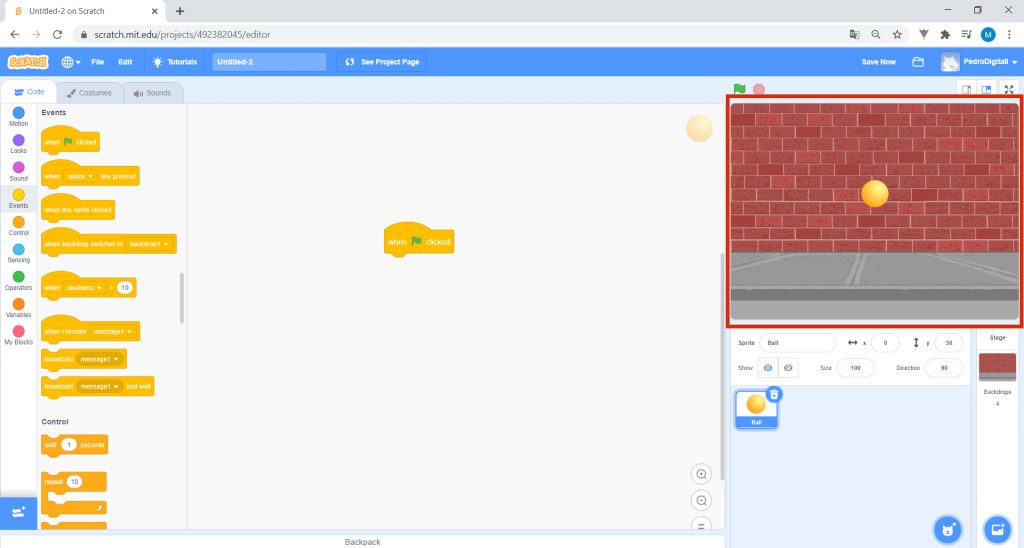

7. Go to Motion and drag the block go to x: “0” y: “30” to the Scripts area, immediately below the previous block. In your code, the coordinates indicate where the ball is on the Stage.
ADDITIONAL INFORMATION FOR TEACHERS
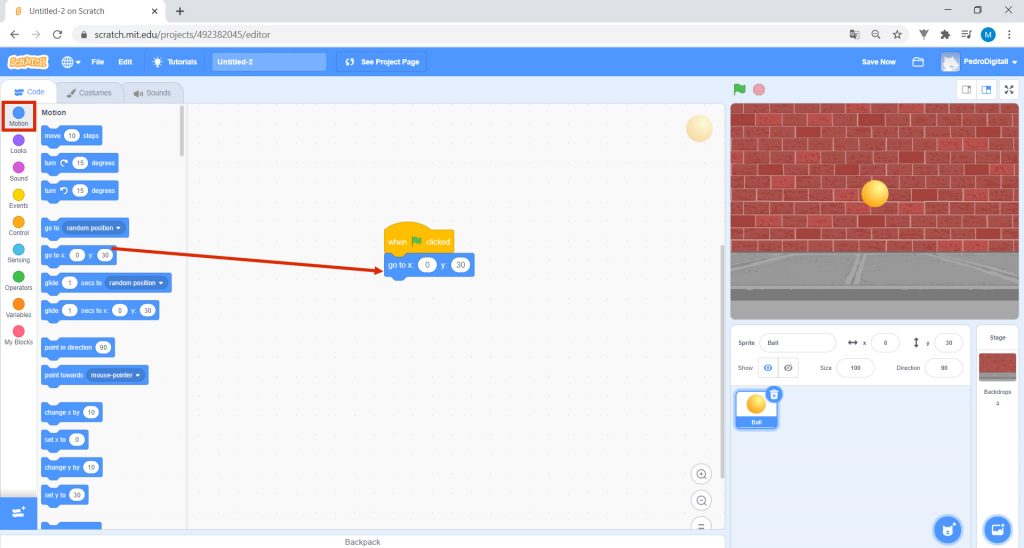
You can explain what a Cartesian coordinate system is. In mathematics, the Cartesian coordinate system is often used. This consists of two axes: one horizontal, the x axis, and the other vertical, the y axis. The center, where they come together, is the point where x is zero and y is also zero. It’s possible to say where any point is in this system, indicating its location at x and y. The values of x and y are called coordinates.

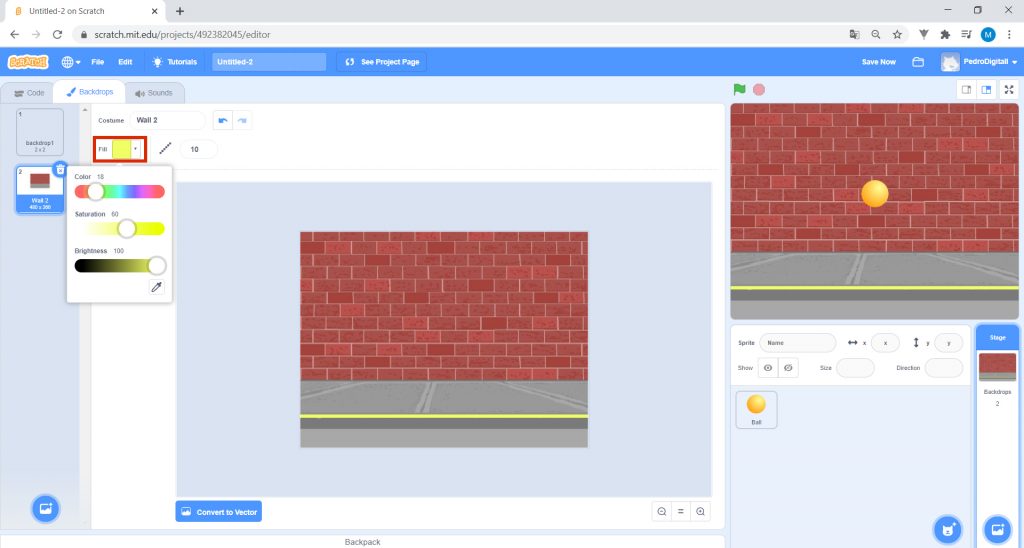
8. As we mentioned earlier, you want the ball to move from side to side on the Stage, bouncing whenever it touches a wall, except the bottom one. There it must stop. But how do you stop it? Click on the lower right side which says: Stage and go to the Choose a backdrop tab, Which just appeared on the upper left corner.

Select the yellow color and the Line. Draw a line at the lower limit of your scenario. Whenever the ball touches the color yellow, it will stop.
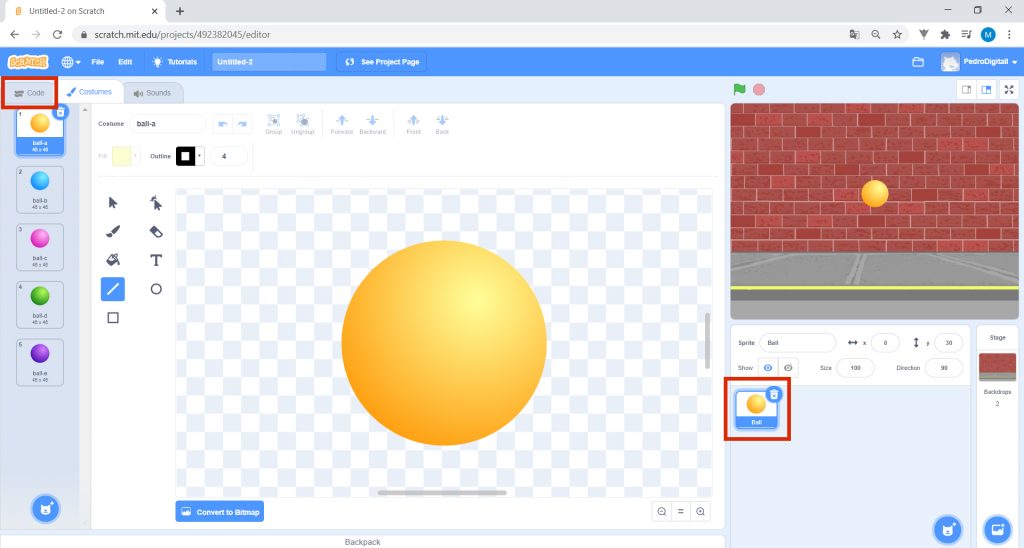
Then select the Ball and the Code tab.
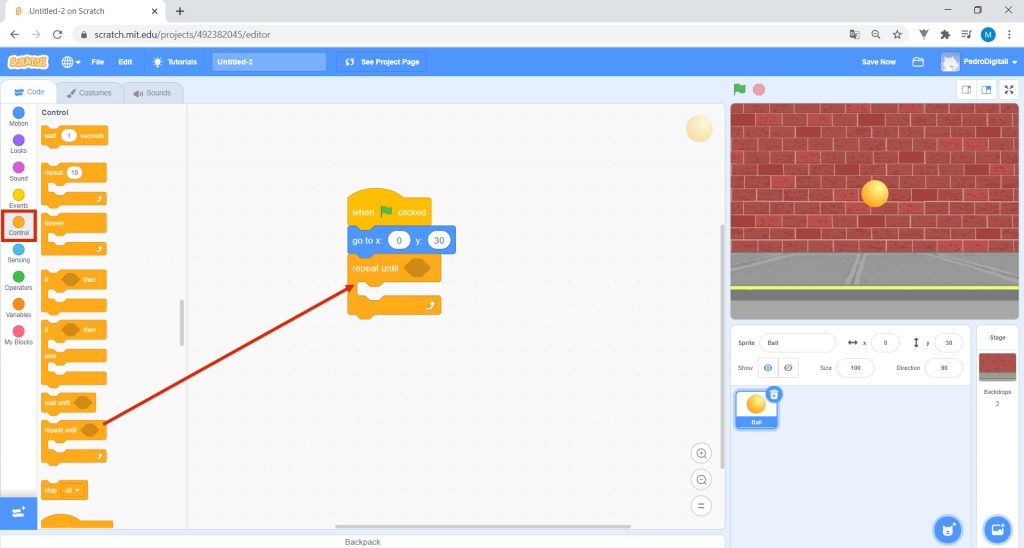
In the blocks, go to Control, and select the block repeat until _ and drag it to the Scripts area.
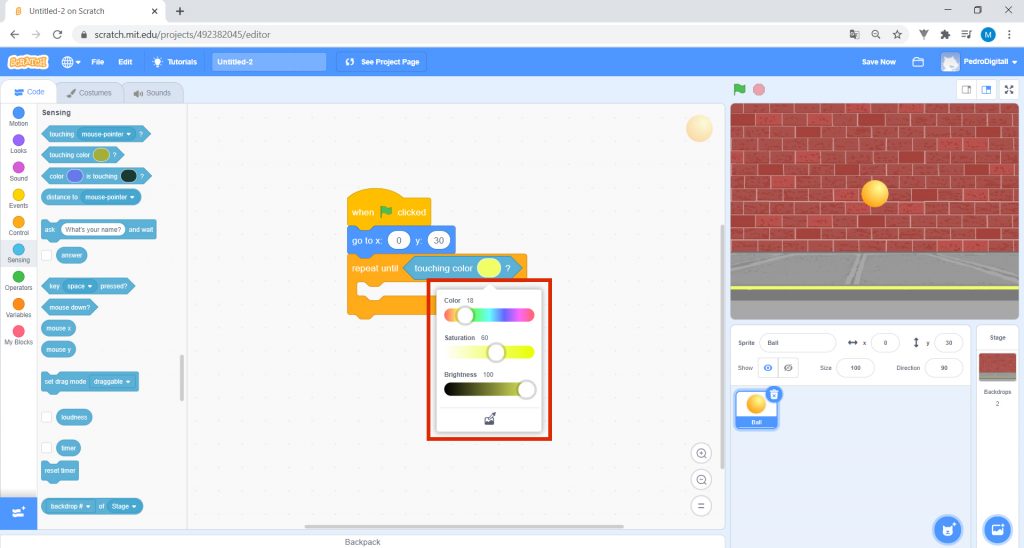
In the meantime, go to Sensing, and drag touching color “_”? to the Scripts area. Insert this block in repeat _ until, as shown in the figure.
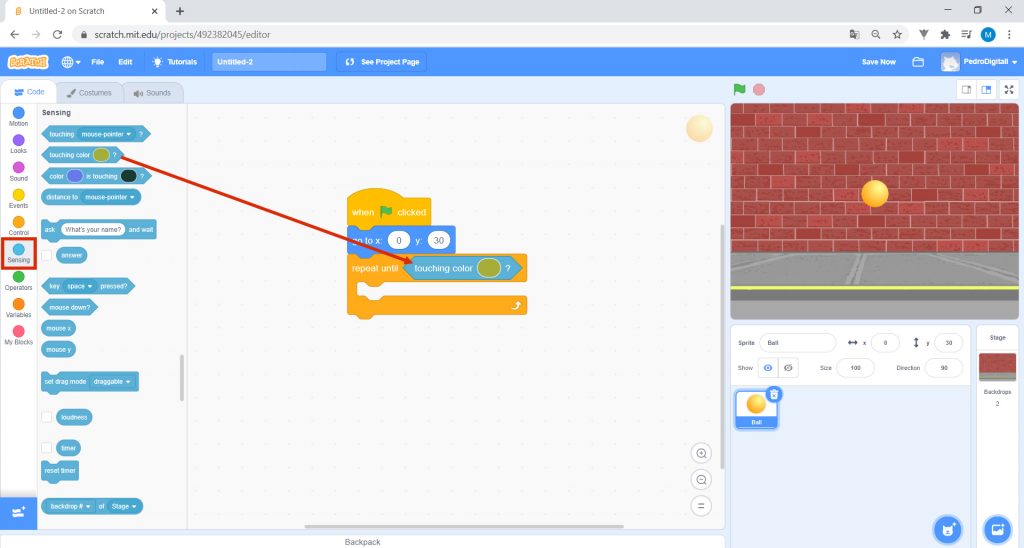
Then, in the block touching color “_”?, select the color yellow. Attention: the selected color must match the color of the line previously drawn.
ADDITIONAL INFORMATION FOR TEACHERS
Explain to the students that each color has a specific code and tell them what they must do to obtain the exact code of the yellow color initially selected to draw the line. To obtain the same color code, in the block touching color “_”?, you must click on the change color icon and then select the icon that has a pipette above the image. To obtain the same color as any of the objects on the Stage, click on the object while the pipette is selected. In this case, click on the yellow line.
Now, go to Motion and drag the block move “10” steps inside the block.
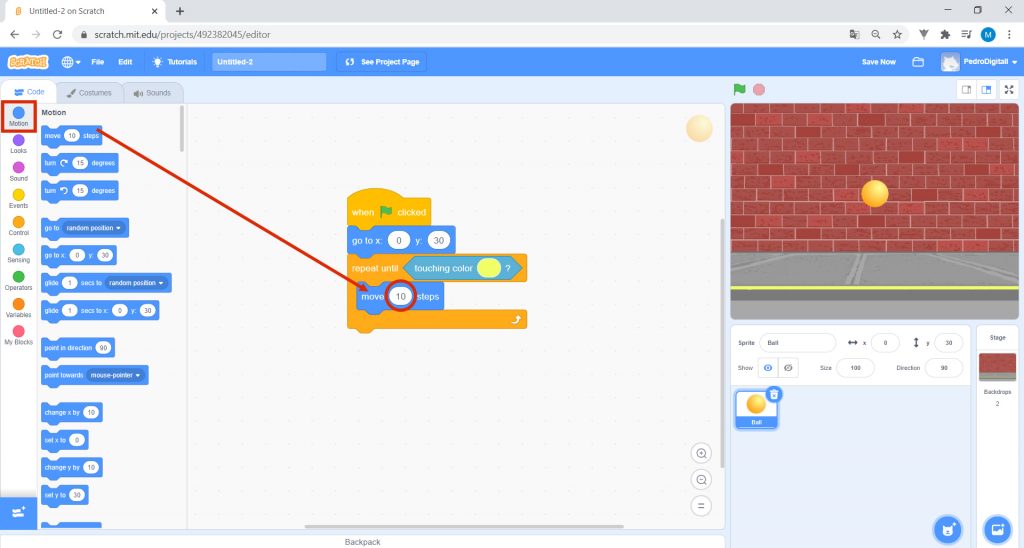
Still in Motion, drag the block if on the edge, bounce under the block move “10” steps.
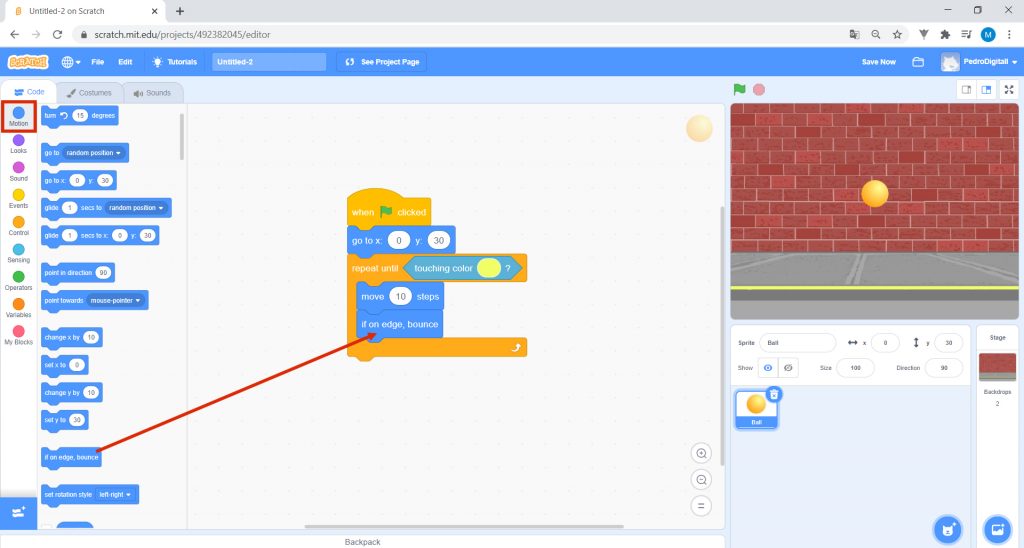
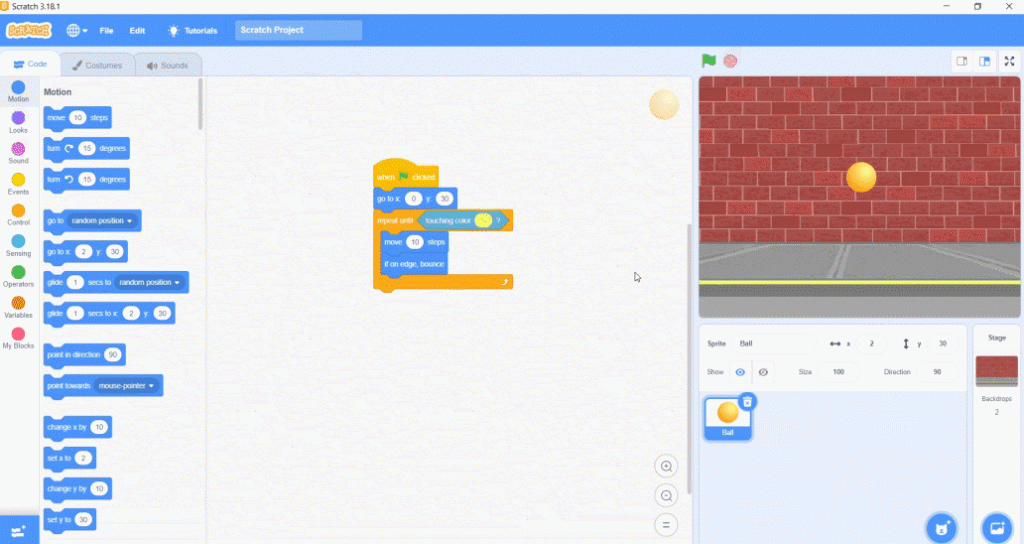
Click on the green flag and see what happens. The ball moves and bounces when it touches the wall. If that doesn’t happen, review the code. Confirm that you did everything correctly.

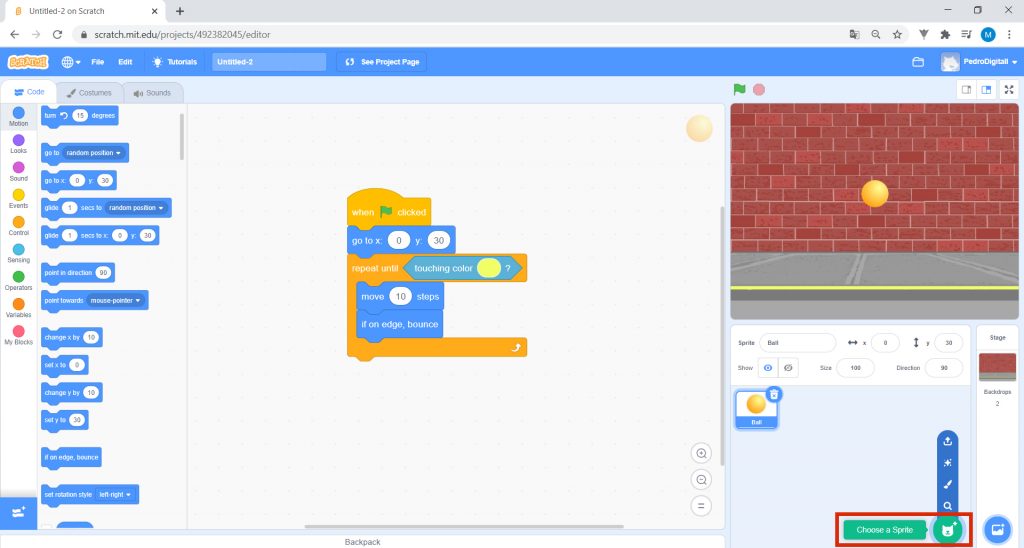
9. The Ball is now programmed… But this isn’t quite a game yet, is it? For it to be a game, you need one more little piece. Select Choose an Sprite.
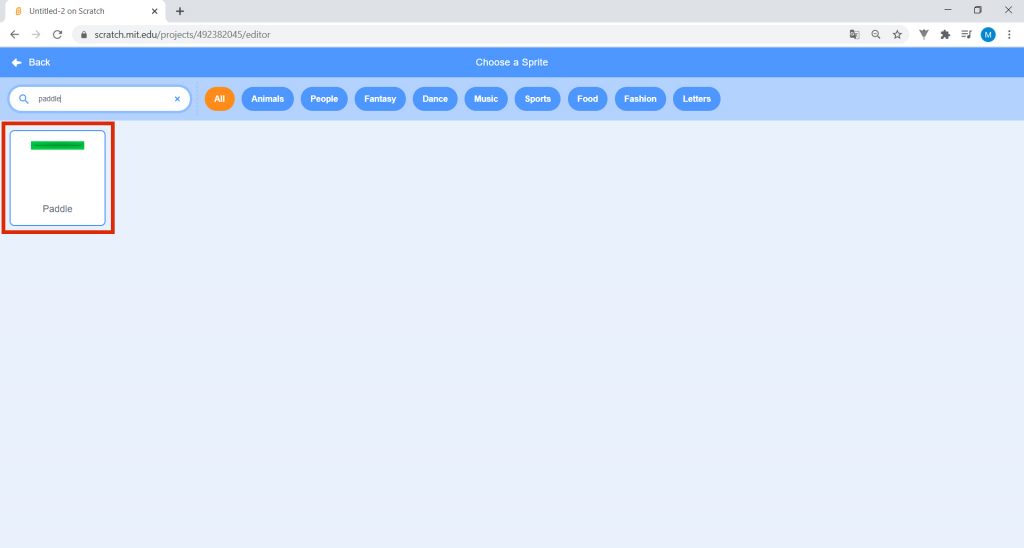
Choose Paddle. If you can’t find it, search for it where it says Search.
With Paddle selected, you will now program it.

10. In the blocks area, go to the Events blocks, select When green flag clicked and drag it to the Scripts area.
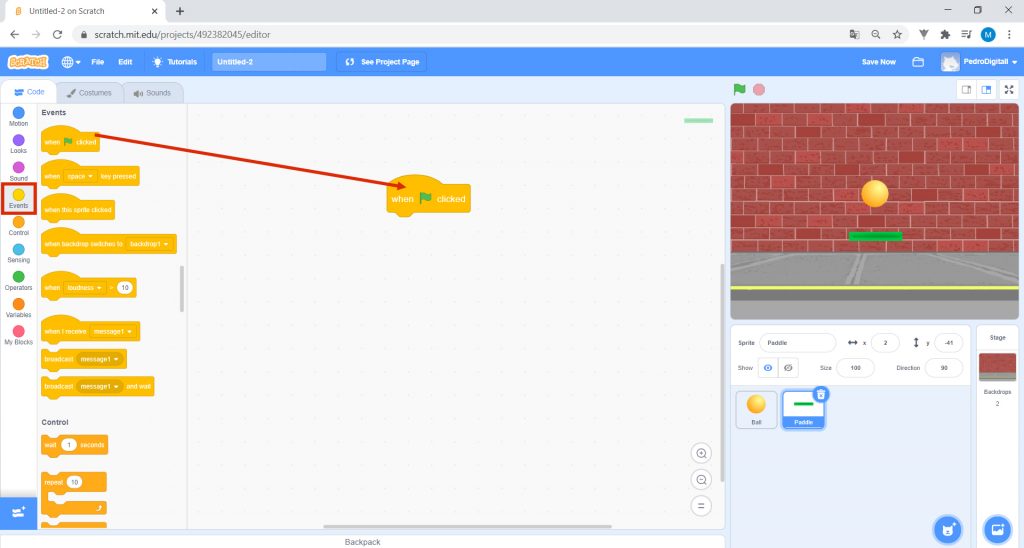
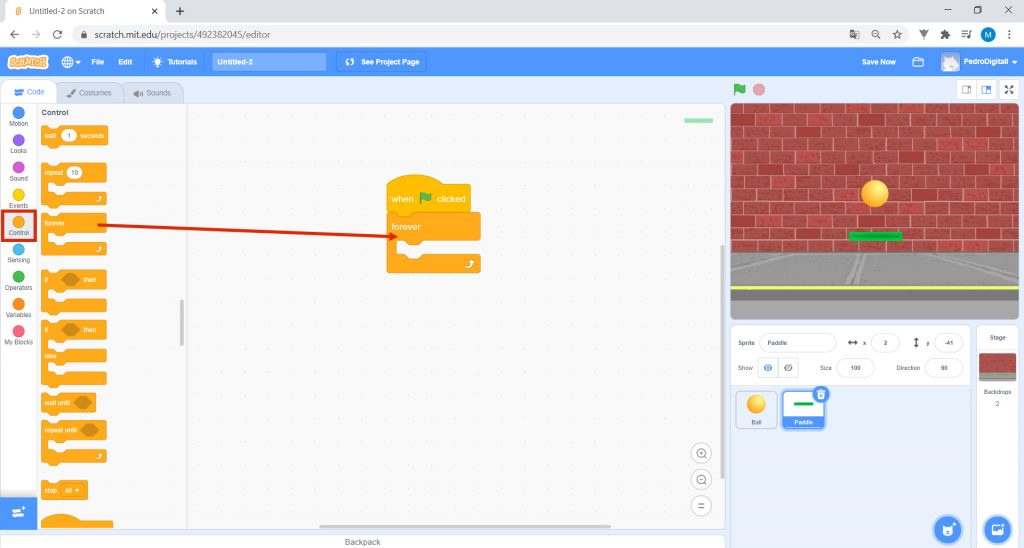
Click on the Control blocks and drag the forever block to Scripts, fitting it under the previous block.
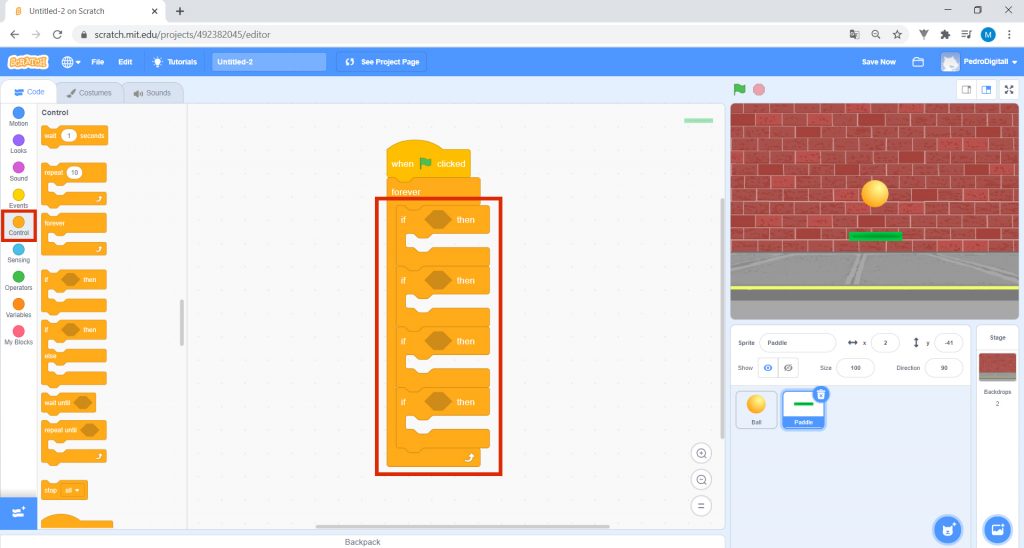
Then, go to the Control blocks and drag four blocks if_ then to Scripts, fitting them inside the previous block as in the figure.
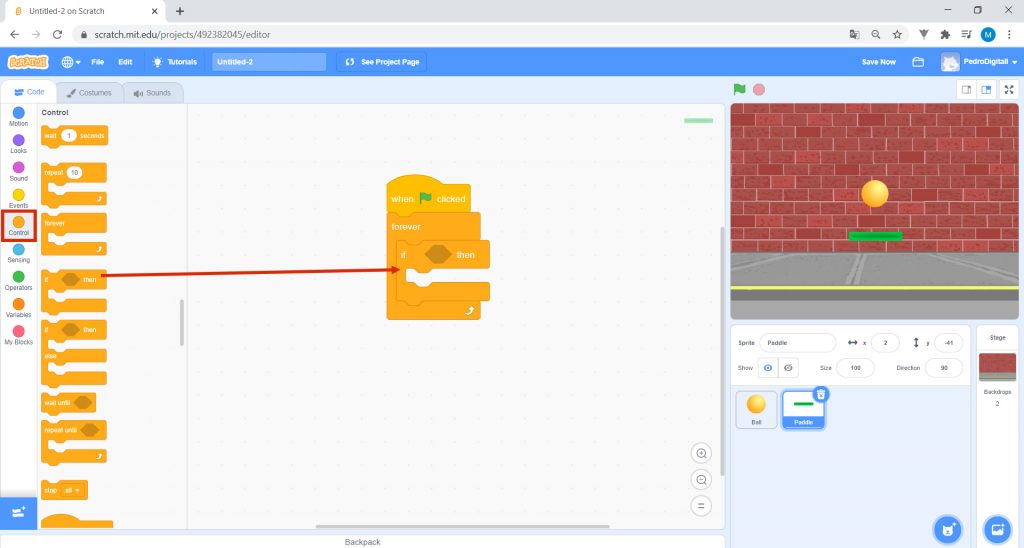

11. The aim is to move the Paddle, using the directional arrows on the computer.
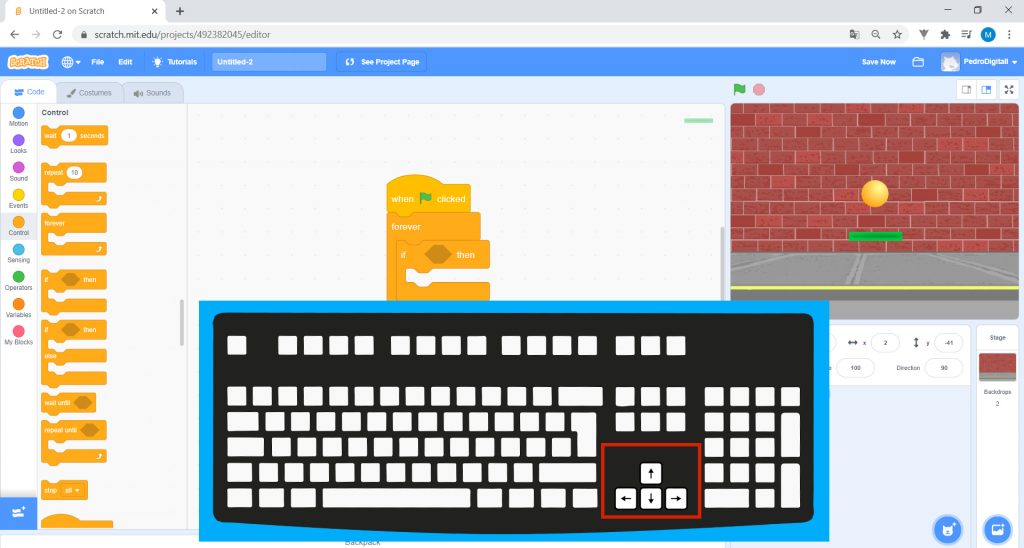
Each if_ then corresponds to a directional arrow: up, down, left and right.

12. To give this information to the program, go to Sensing and drag a block key “_” pressed? into each block if_ then. In each block, select an arrow: up arrow, down arrow, left arrow and right arrow.
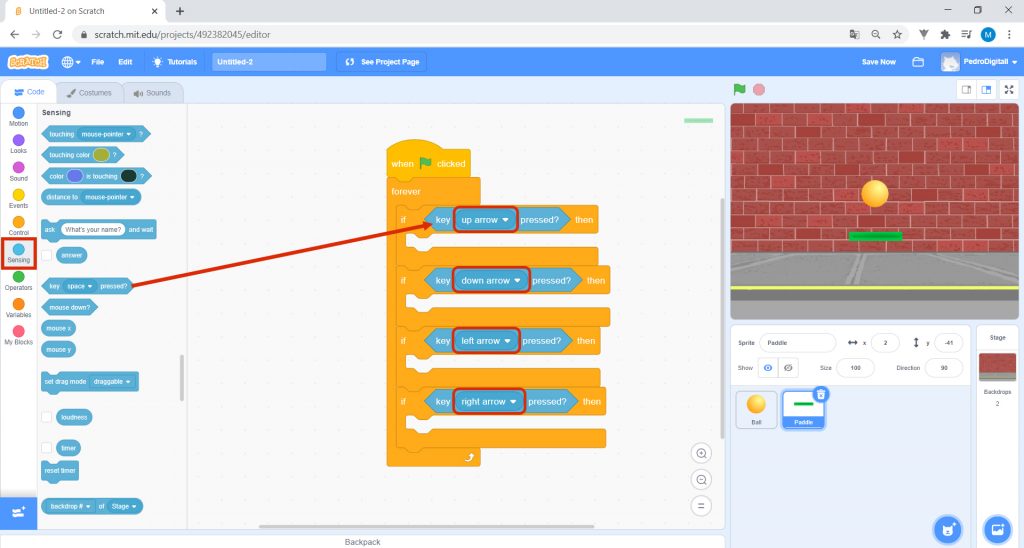
Then, go to Motion and drag a block change y by “_” inside the block, key “up arrow” pressed?
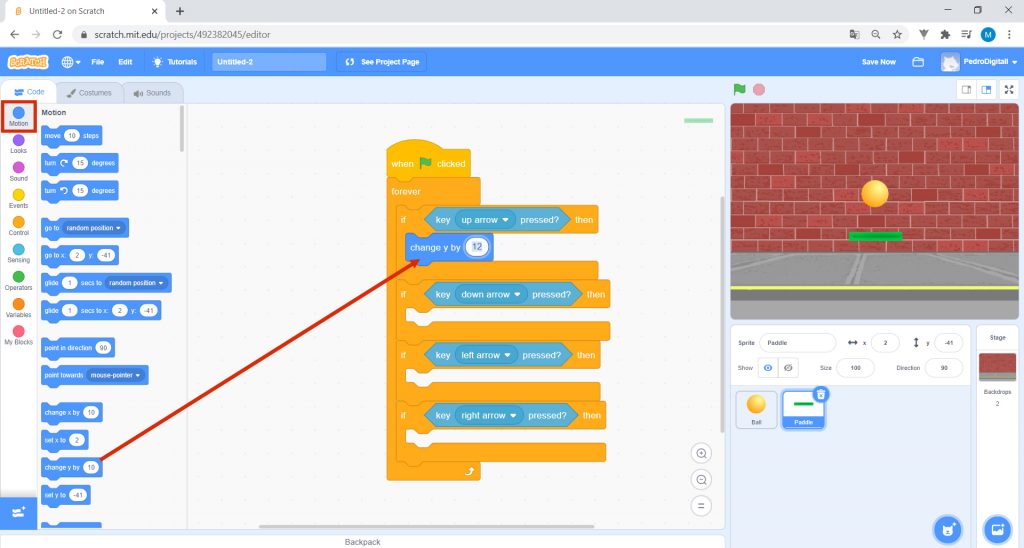
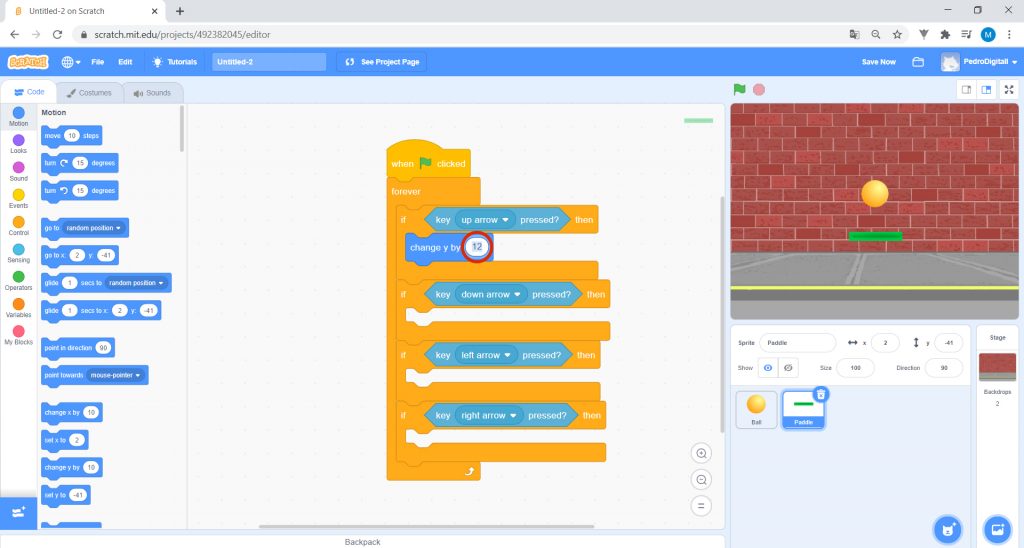
Replace the number in the block change y by “_” with the number “12”, as shown in the image. Each time you click the computer’s up arrow, the Paddle will move 12 steps up.
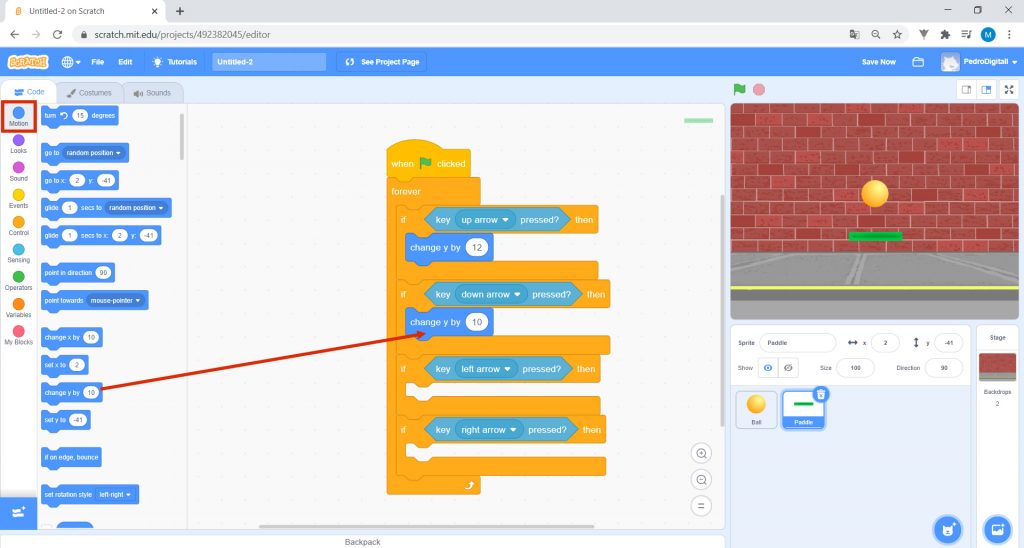
Go to Motion and drag a block change y by “_” into the block key “down arrow” pressed?
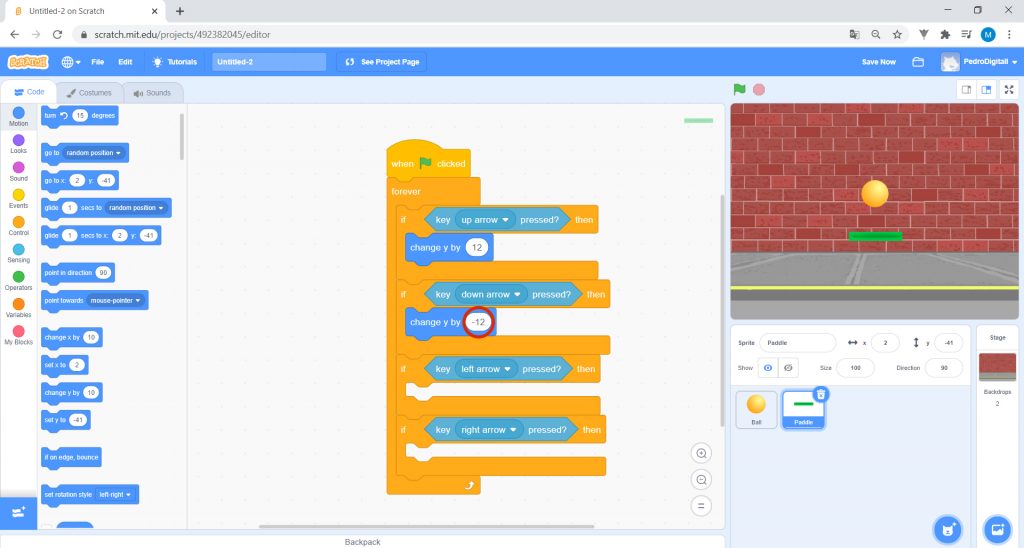
Replace the number in the block change y by “_” with “-12”. Each time you click the computer’s down arrow, the Paddle will move 12 steps down.
Go to Motion and drag a block, change x by “_” into the block, key “left arrow” pressed?
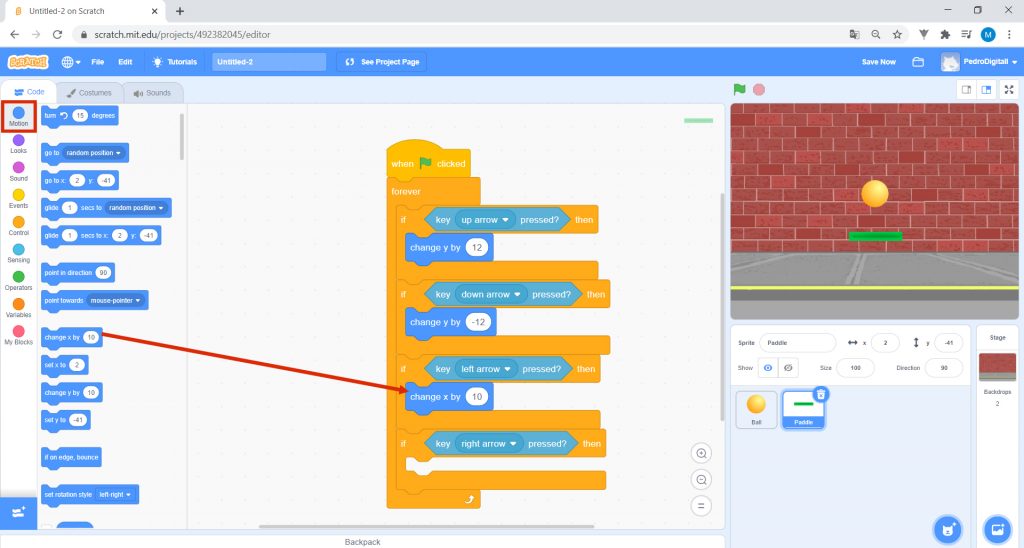
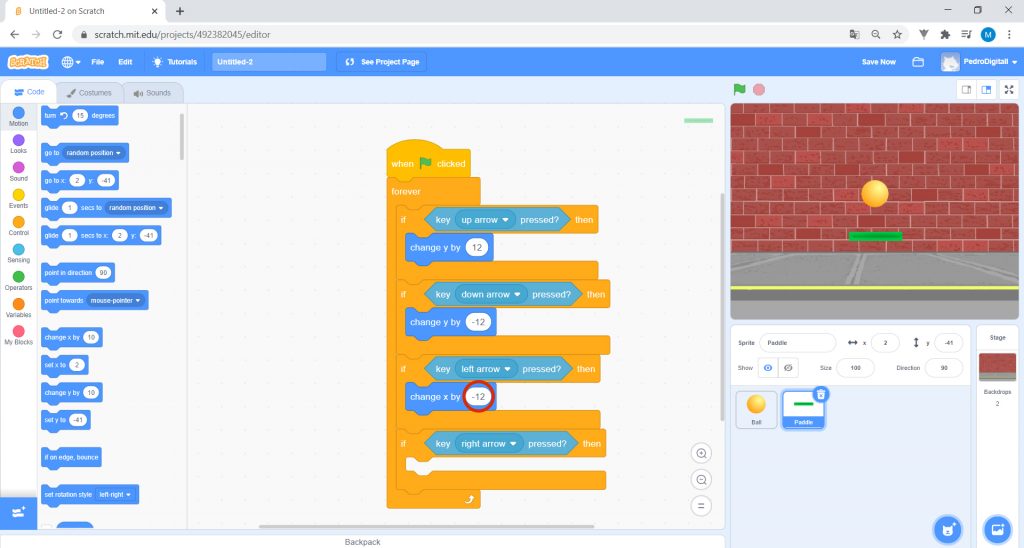
Put “-12” in the change x by “_”. Each time you click the computer’s left arrow, the Paddle will move 12 steps to the left.
Then, go to Motion and drag a block change x by “_”. into the block, key “right arrow” pressed?
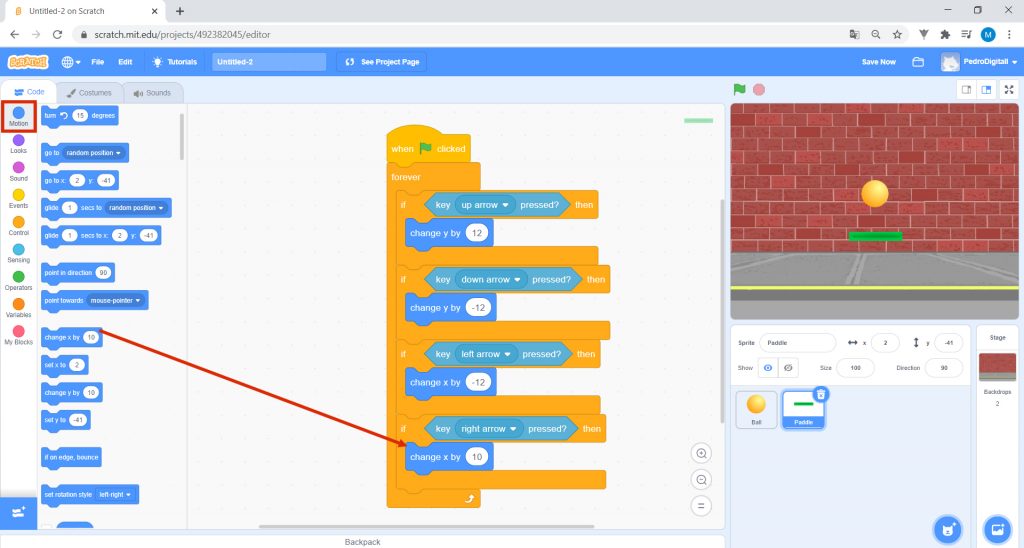
Again, put the number “12” in the change x by “_”.. Each time you click the computer’s right arrow, the Paddle will move 12 steps to the right.
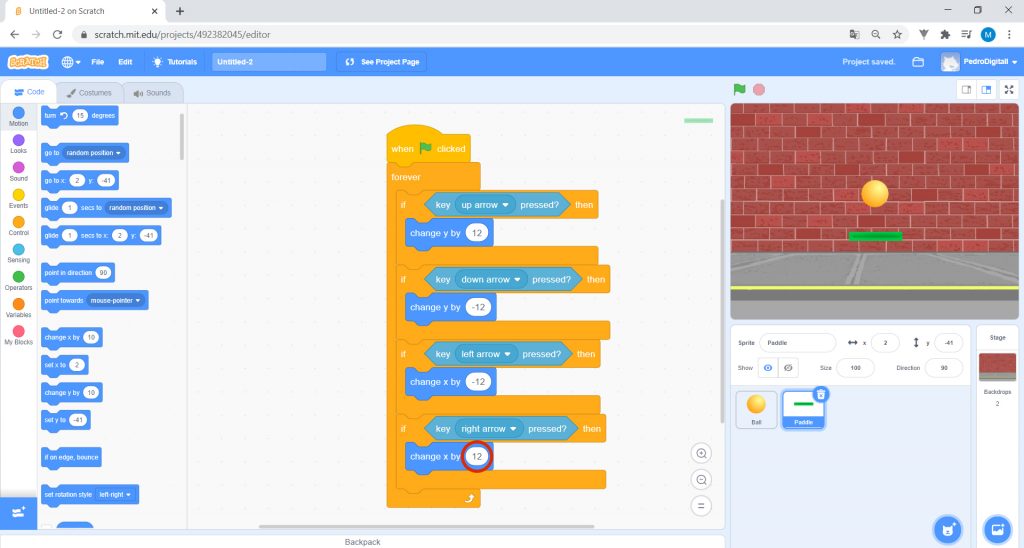

13. The Paddle is now programmed. Now, you just have to go back to the Ball and program it so that it bounces whenever it touches the Paddle.
Select the Ball. The respective code should appear.
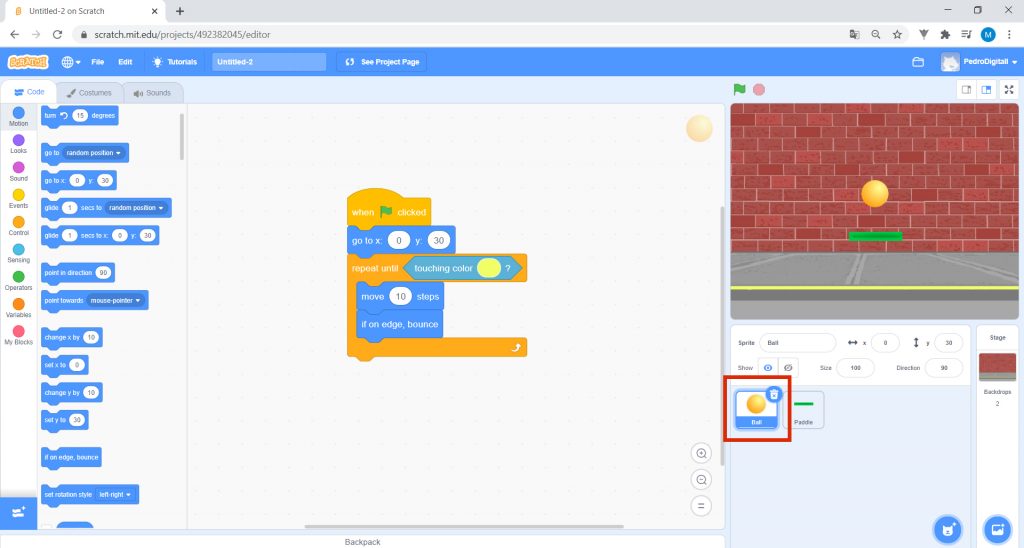
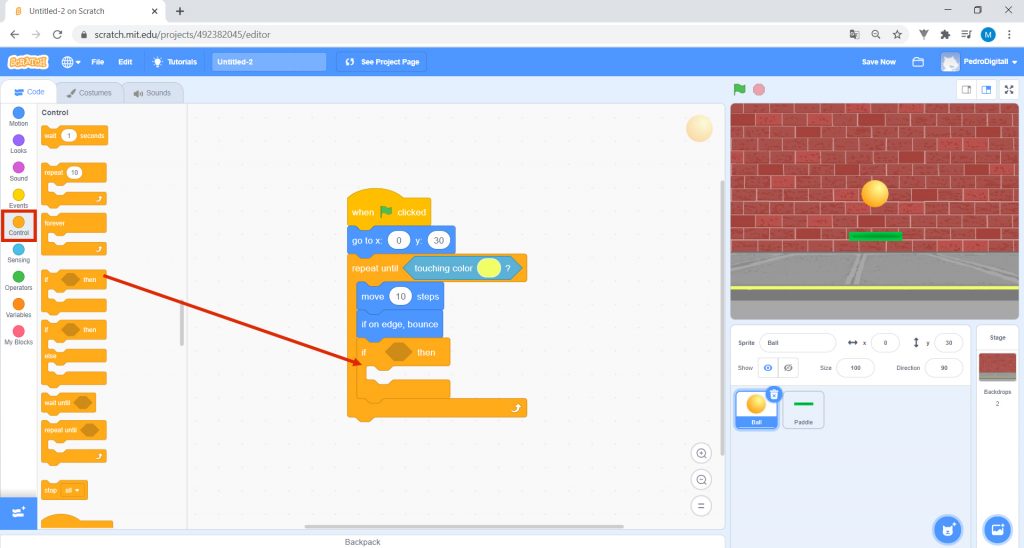
Go to Control and drag the block if _ then place it under the block if on the edge, bounce as in the image.
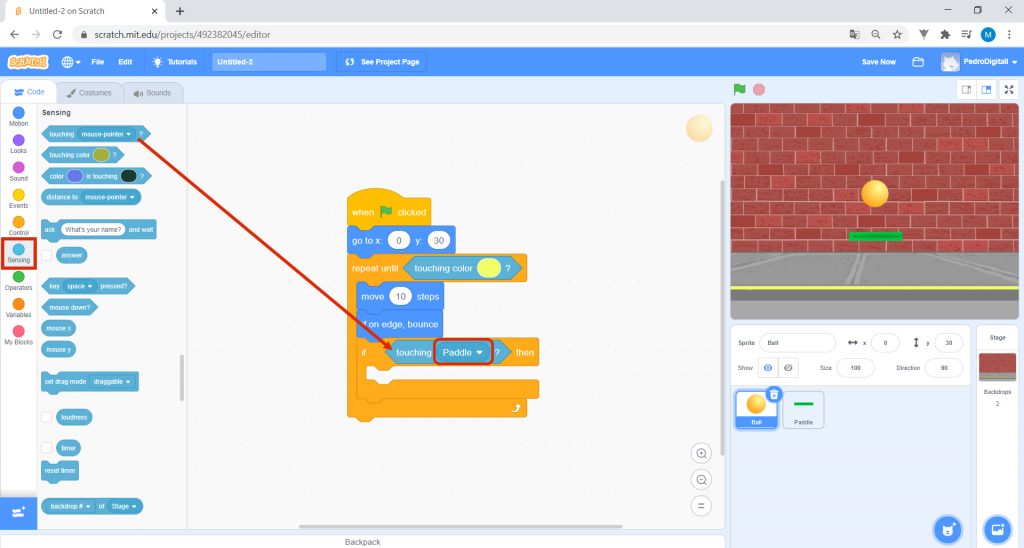
In Sensing, drag the block touching “_”? into the block if _ then. Within the block touching “_”, select Paddle.
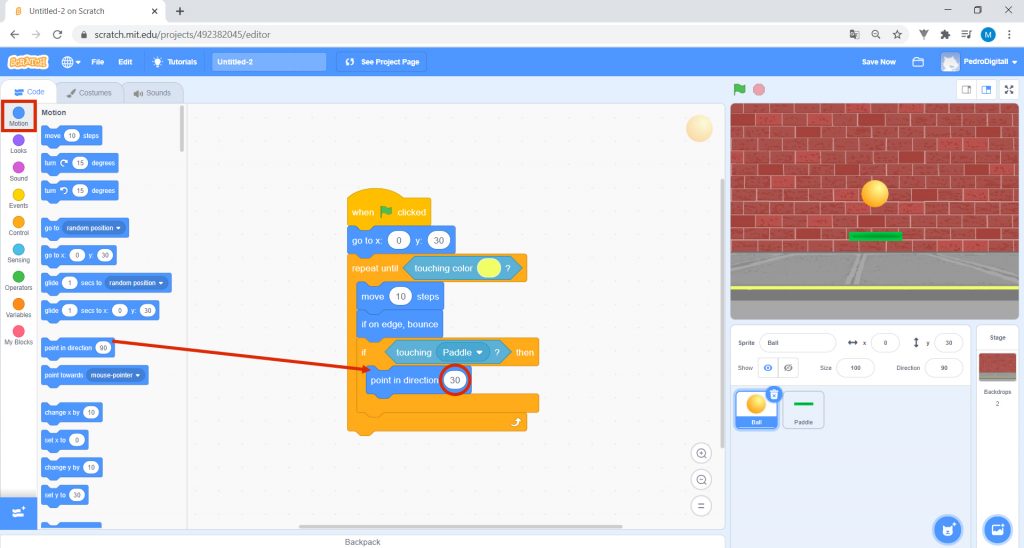
After that, in Motion, choose the block point in direction ”_”º and place it inside the block if touching Paddle? then. Write “30” in the space: point in direction “30”º.
This last part of the code tells Ball that it has to change direction 30º each time it touches the Paddle. This implies that the ball doesn’t always have the same trajectory, making your game more challenging!
Finally, go to Looks and drag the block say “_” for “2” seconds beneath all your code. Complete as in the picture: say “You Lost!” for “2” seconds.
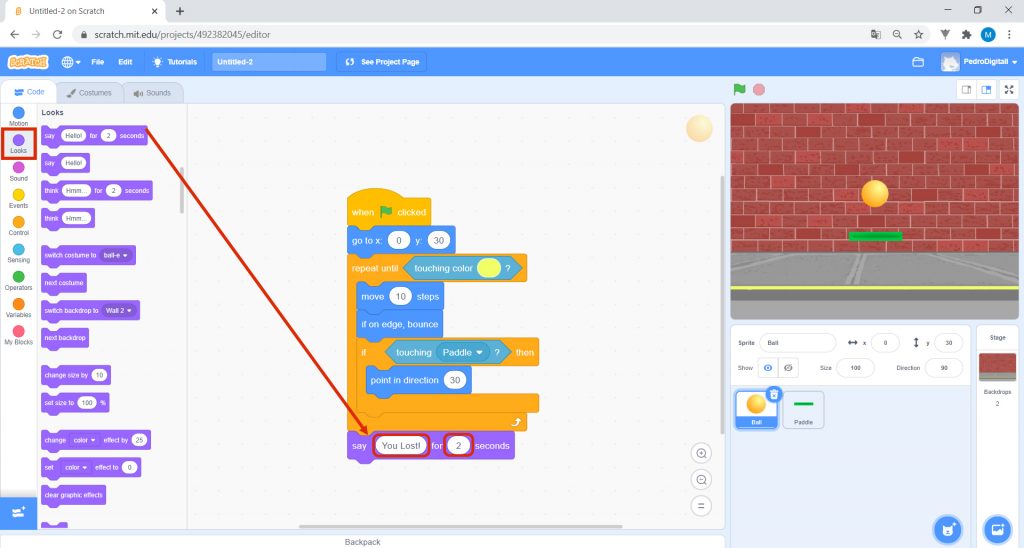
When you lose, that is, when you touch the yellow line you created, you exit the block until _ repeat. The next line instructs the ball to say that the player has lost for two seconds. Oops!

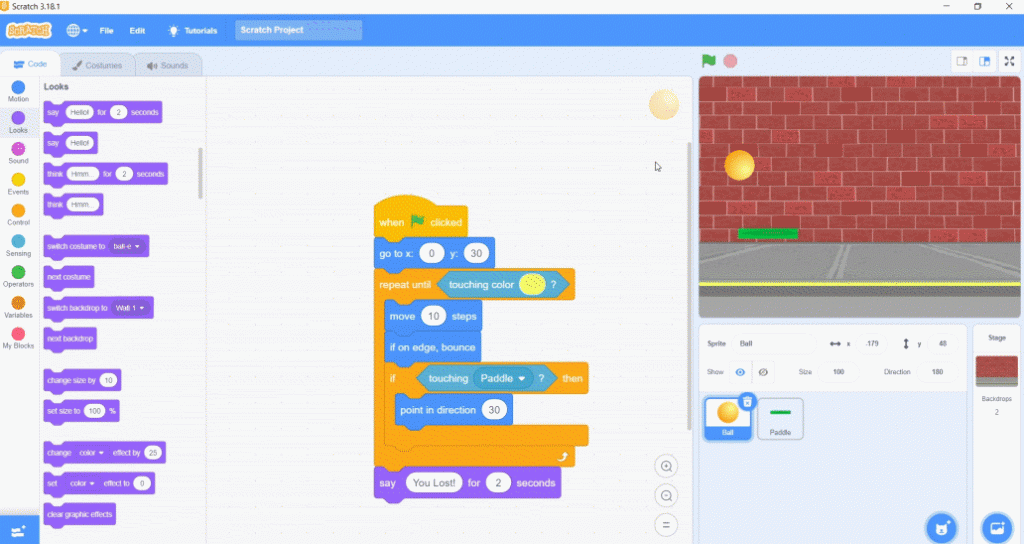
14. Now, click on the green flag and start playing! Good luck!

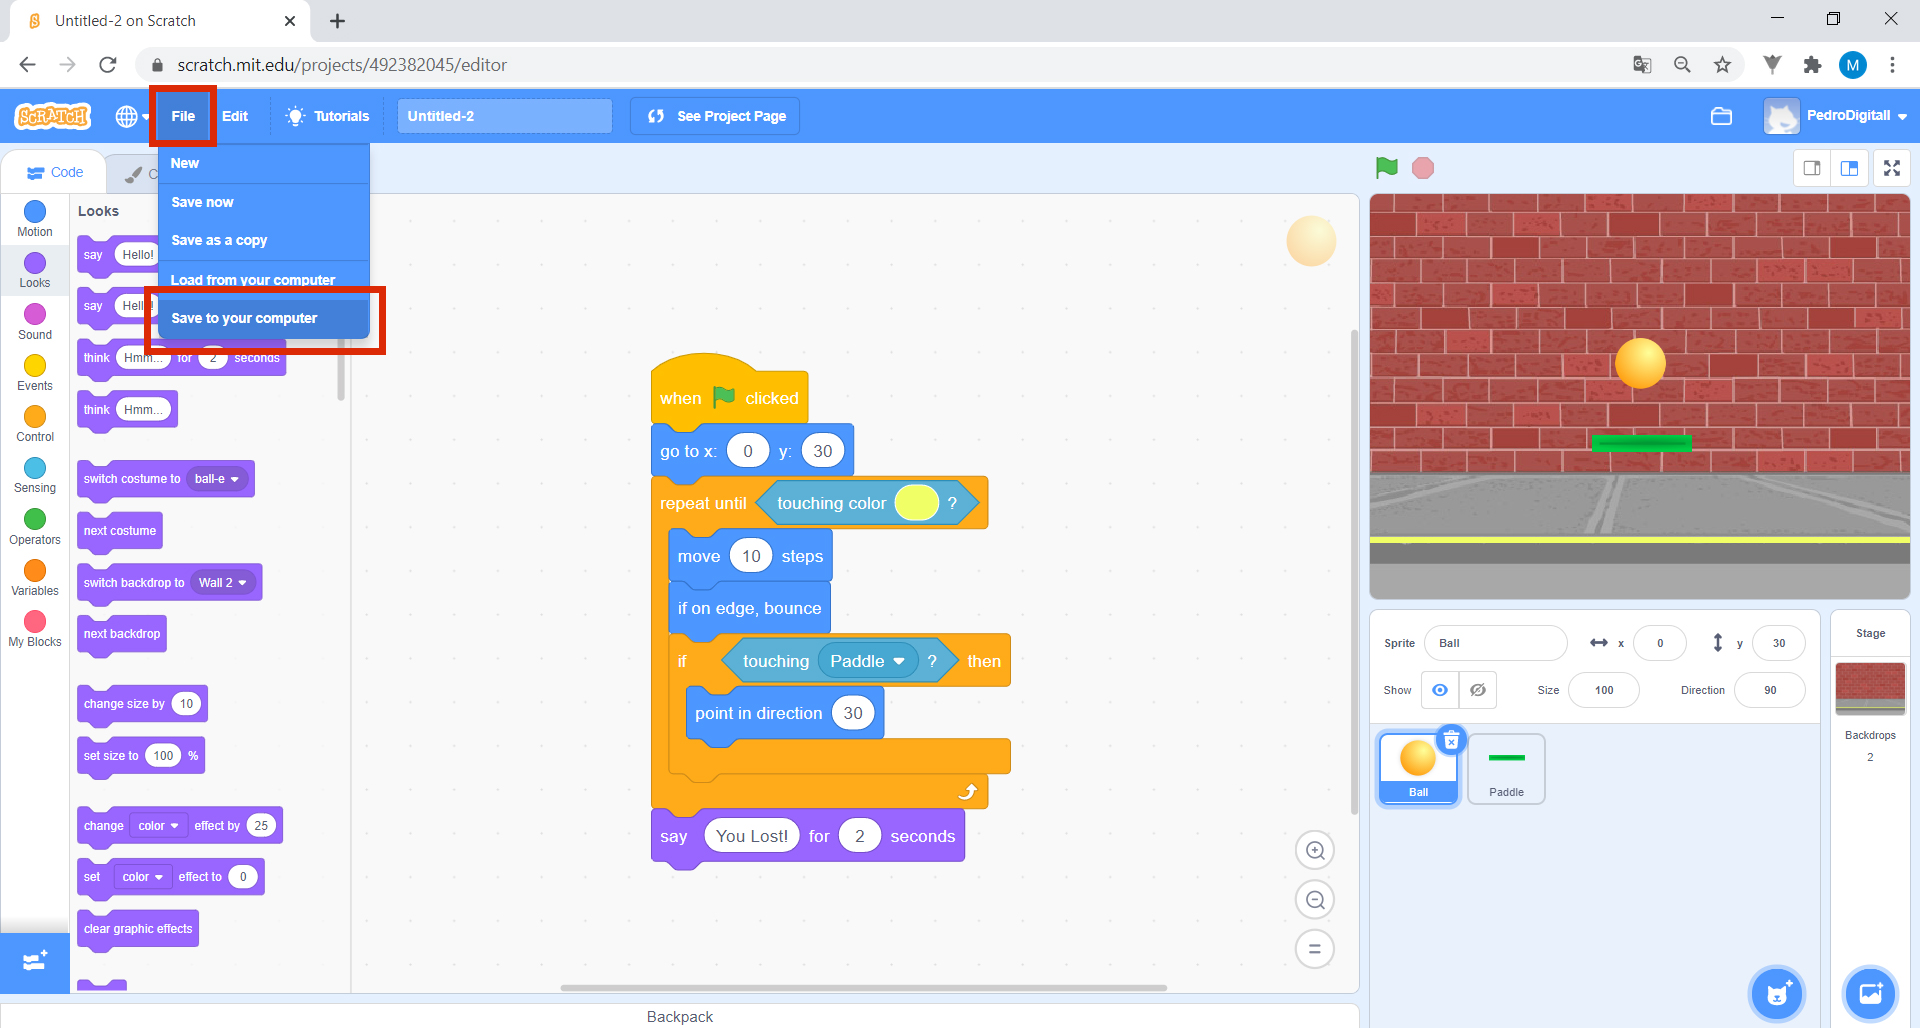
15. Now, save your project so you don’t lose it and you can open and edit it whenever you want. At the top of the program, go to File and select Save to your computer.
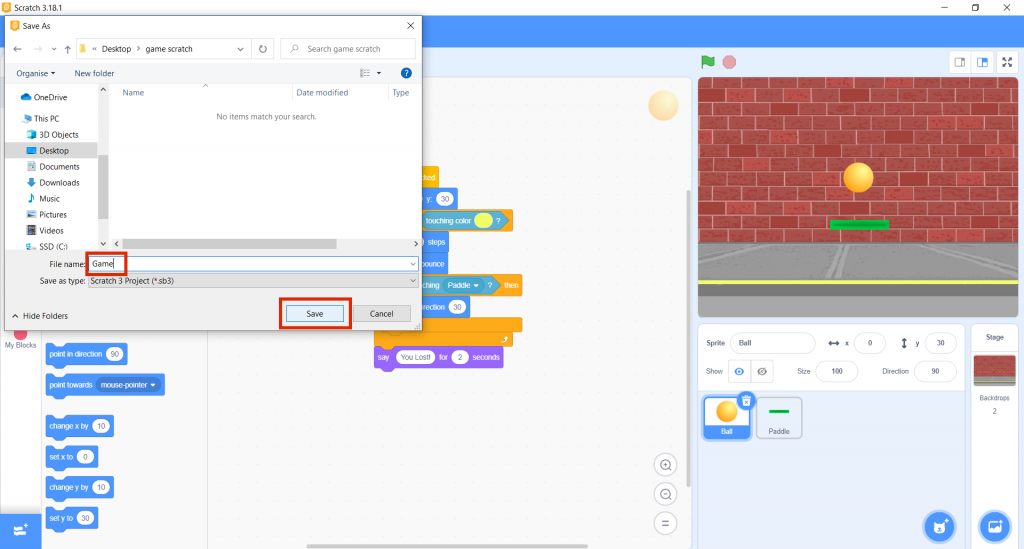
Choose the folder where you want to save it and in File Name write Game. Then click Save.

16. The game is ready… But maybe it would be interesting to think about scores, wouldn’t it?
That’s what we’re going to do in the next lesson! See you then!